
WordPress is a popular free open-source content management system (CMS) in the market. It is said to be the most simplest and popular platform to create websites and blogs. In fact, as per statistics, there are around 43% of all the websites on the interest are created using WordPress. We can say that one out of four websites is developed on WordPress. With its massive ecosystem of themes, templates & plugins, one can create a website as per their business niche and needs. It not only powers a large number of blogs and business websites but it is also the most powerful platform to create an E-Commerce Store.
Also Read: A Beginner’s Guide for WordPress Child Theme
Managing multiple websites can be a challenging task especially when all of them are under the control of the same user. It can be more time-consuming and difficult to remember all the details and make changes to them so it is important to find an efficient approach to manage multiple websites. Perhaps consolidating websites into a single platform can be helpful to simplify the process & making it easier to keep track of all the changes or updates.
WordPress Multisite formerly known as WordPress Multi-User (WPMU) is a powerful WordPress feature that allows you to create a network of multiple websites easily & quickly from a single WordPress dashboard. It is what businesses, organizations & individuals are looking for as this lets you make changes easily and keep all of your websites updated from one place. WordPress.com is the perfect example of a WordPress Multisite Installation which is running millions of sites. With Multisite, you can create a main website or network and then add additional websites or subsites to the network. In a WordPress Multisite setup, you can create a network of sites that share a single WordPress installation, database and set of plugins & themes. So we can say that it lets you turn your website into a network of websites.
Also Read: What are the Functionalities of Actions, Filters and Hooks?
Multisite is a great option for those who want to manage multiple websites from the same WordPress Installation. Multiple websites in a multisite network share databases & core files as well as network administrators can effectively manage all the websites from one WordPress user account. This approach gives benefits such as themes, plugins & centralized user accounts. Multisite comes with various unique features and advantages, let’s take a look at some of the benefits:
1. Centralized Management: With WordPress Multisite one can manage all the websites from a single dashboard. This makes it easy to update themes, plugins & WordPress core files across all the sites at once.
2. Cost-effective: Hosting multiple websites on a single WordPress dashboard, that’s why installation can be more cost-effective than hosting each site separately.
3. Consistent Branding: Multisite allows you to use the same theme and branding across all your websites, creating a consistent user experience.
4. Easy Setup: Setup a new website on WordPress Multisite is a quick & easy task. One can develop a new website with just a few clicks.
5. Content Sharing is easy: With Multisite, content can be easily shared between websites. This is more beneficial when you want to share the content between different departments & teams within the organization.
6. Scalability: Multisite is highly scalable which makes it an ideal choice for organizations that are in need to manage a large number of websites.
7. Simplified Site Creation: Creation of a new website in a WordPress Multisite Network is as easy as clicking a button. One can create new sites with their own domain names or subdomain names in few minutes.
8. Shared Resources: With Multisite, sharing resources such as plugins, themes & user accounts across all of your sites will be quite easier. This can save time & money as you don’t need to install the same resources on each site individually.

Also Read: Why Do WordPress Websites Use Old PHP version?
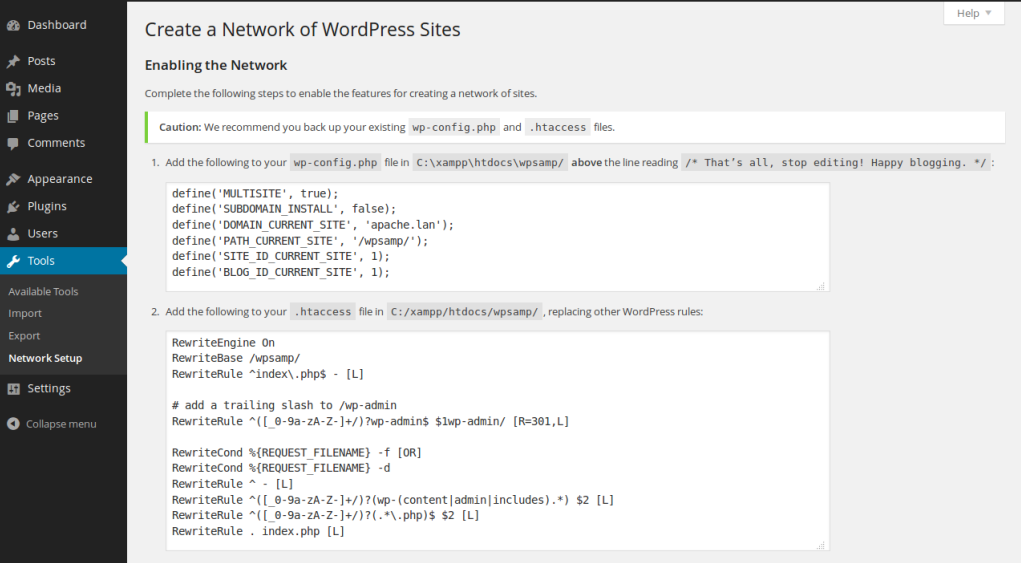
By default Multisite feature in WordPress Installations comes as disabled. Hence, first you need to turn it on by adding a line of code to your site’s wp-config.php file. To do this, you have a number of options. Either go through cPanel or connect via FTP. Once you locate and open the wp-config.php file from site’s root directory, browse to where it says “That’s all, stop editing! Happy blogging.”
Just above this line, paste the following code above it:
/* Multisite */
define( 'WP_ALLOW_MULTISITE', true );
Once you are done with the code, save the file and refresh the browser. Now, WordPress Multisite feature is enabled.
Once the multisite feature is enabled, the next step is to install your network in WordPress. From your WordPress Dashboard, go to Tools > Network Setup and choose subdomains or subdirectories to denote subsites. Decide on your configuration as switching can be challenging later on. Change network details including server address, network title, and admin email. Click Install and WordPress will create the necessary database tables for your multisite network.
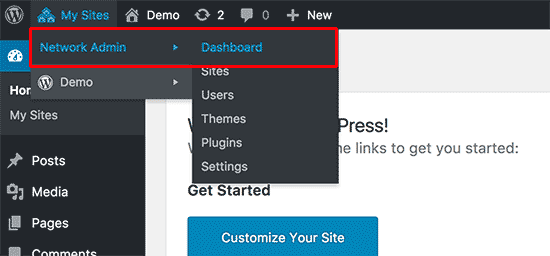
When you are done with the file saving, follow these instructions to move ahead with the setup.
Go to the dashboard and click here on Network Dashboard to change the settings, add new sites, and other useful configurations. Click on the Network Admin » Dashboard.
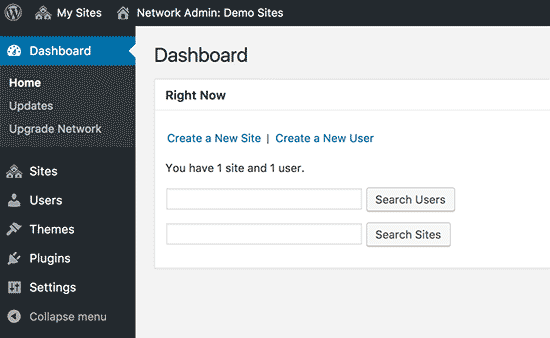
From there you will be redirected to the multisite network dashboard. As you can see there are new menu items to manage multisite network; you will also find a Right Now dashboard widget that allows to generate a new site and add new users.
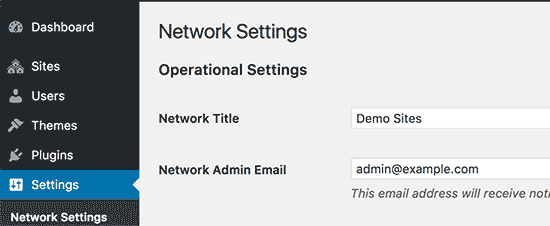
To configure network settings, first you need to click on the Settings link in the admin dashboard sidebar followed by Network Settings. And the first option you will see on network settings page is to set your network title and admin email address.
Also Read: Top 10 Dominating Web Development Trends to Look for in 2022
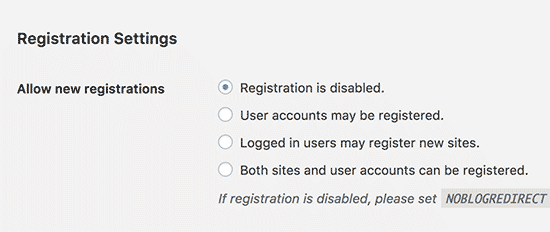
The Registration Settings section on the network settings page is an important setting in your network setup. By default, both site registrations and users are disabled on the network. You can choose to open registrations on your multisite network to allow existing users to create new sites or to new users to register on your site.
While opening your multisite network to registration, you can check the box next to the Registration Notification option to receive all the email notifications every time a new user or site is registered. If you wish to allow individual site administrators to add new users on their sites, then you can check the box next to Add New Users option.
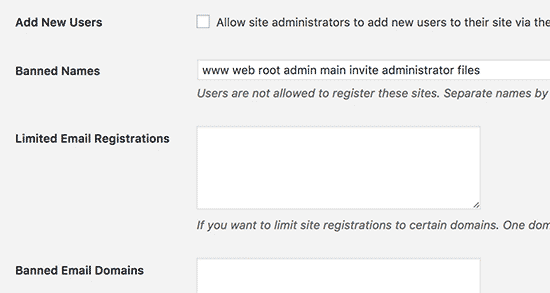
Limited Email Registration option will allow you to limit site or user registration to email addresses from particular domains. If you only want to allow people from your own organization to register and create users or site, you can do that too. You can have also have the option to ban certain domains from registration.
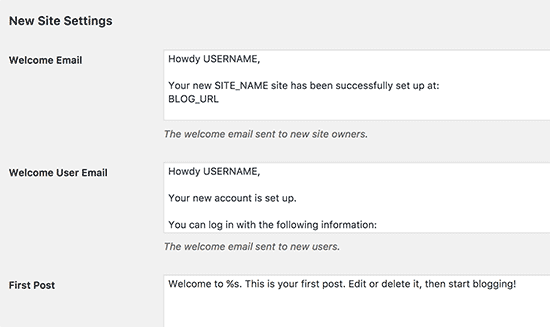
Congrats, you now have WordPress Multisite Network almost installed and setup. However, there are few things remain to be done. The New Site Settings section is used to configure default options for the new sites created on your multisite network. You can modify the welcome emails and the contents of the first default post, page and comment in these settings.
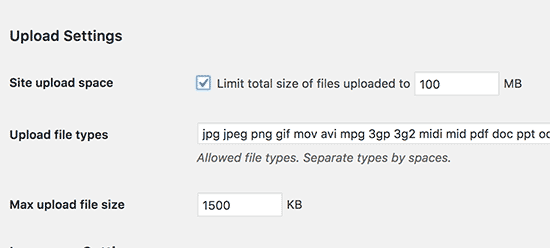
You can choose a file size limit, the default upload file types are images, audio, video and pdf files.
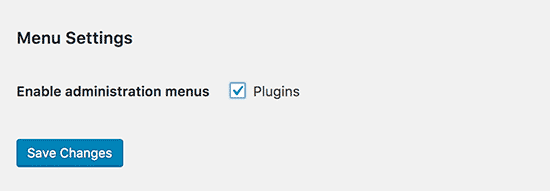
The plugins and themes that you do install will be available to individual sites on the network. Then It will allow you to enable the administrative menu for the plugins section on your network sites.
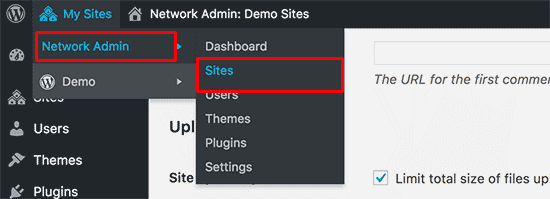
If you want to add a new site to your WordPress Multisite Network, click on sites under My Sites » Network Admin menu in the admin toolbar.
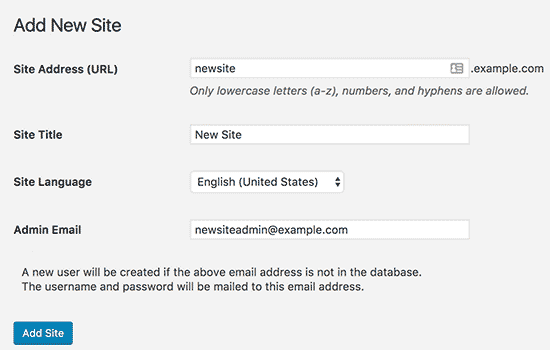
In order to add a new site, click on the Add New button at the top.

On the Add New Site page, you need to provide the site’s address.

Here in this page, you will have a list of currently installed themes on your WordPress Multisite.
To make another theme to be your default theme for new sites you need to add the following code to your wp-config.php file.
// Setting default theme for new sites
define( 'WP_DEFAULT_THEME', 'your-theme' );
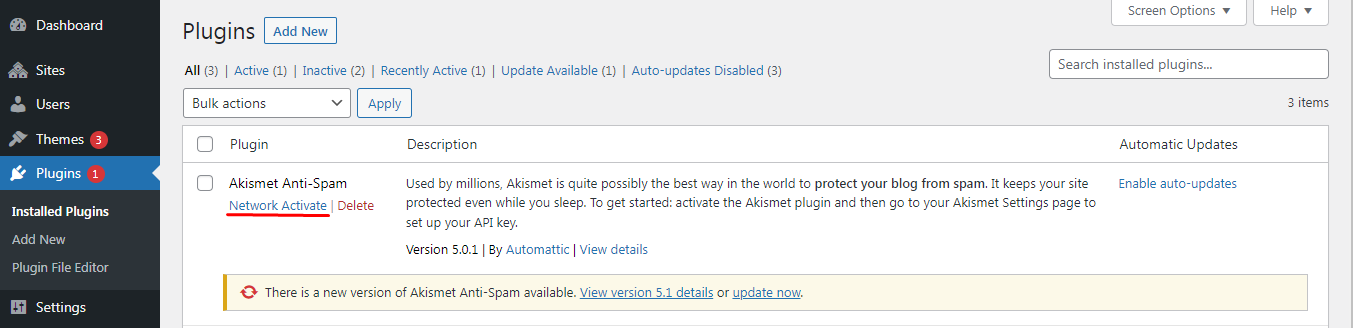
Visit My Sites » Network Admin » Plugins page to install plugins and click on the Network Activate link which is given below each plugin to activate them on your multisite network.
WordPress Multisite is a powerful feature that can save your time and money if you manage multiple websites. So, if you want to operate a series of websites that are somewhat related but also somewhat different then multisite is worth checking out.


A Fun application that allows you to combine two images in a different way. You can modify, resize, move the either of the images and can have fun showing to your colleague/friends. Sprybit made that with very ease.

My app has been recognized by many stores and it is very easy to use in both Android and IOS. Thanks to SpryBit team for making my idea come in reality

SpryBit was a pleasure to work with. From the beginning they had a clear idea how to execute my vision for the website I wanted. Their project managers were clear and helpful in their communication, and kept me up to date with expectation and deadlines. Their developers were happy to modify and improve code based on our needs. Would be excited to work with SpryBit again.
Specially Thank you! for visiting.
Contact us OR call us to get FREE estimate
